


Food Temperature FAQ
Why do I get different results when I test my foods in different locations?
-Because food temperature may be different in different places at the same time. It is not uncommon for the internal temperature of a large roast or turkey to vary by as much as 20 to 30°F (10 to 15°C) throughout the meat or poultry. Even a boneless steak or chicken breast can vary by several degrees when you move the probe tip of your thermometer from the surface to the center of the piece, or from one end to the other, depending on the speed and accuracy of your thermometer.
My thermometer suggested medium but my steak was overcooked, why?
+Remember that the meat will continue to cook once removed from the heat. This is called “rest”. Cooked meat should be allowed to “rest” after cooking and before cutting. This allows the juices to be reabsorbed into the fibers of the meat. If you don't rest, you will lose more juice when the meat is cut. The temperature of the meat will always continue to rise a little during the resting period. Typically, even a small, individually cooked steak or piece of chicken will rise at least three or four degrees upon resting. A larger roast or turkey can rise up to ten to fifteen degrees depending on conditions. You must therefore remove your meat from the oven or grill before reaching the target temperature.
What precautions should I take when grilling with a thermometer?
+Never leave a thermometer inside an oven, grill, smoker, or microwave while cooking unless it is specifically designed for that purpose. Do not leave your thermometer on the grill hood or near an open flame. Some probes are designed to be left inside an oven or grill, but the thermometer housing itself (where the electronics are kept) should generally be kept cool and should not be brought near the heat only for short periods. When checking temperatures over a grill or fire, be careful that the body of the thermometer does not become too hot.
Why is my chicken still bleeding but my thermometer says it's cooked?
+Because the bone marrow in chicken bones can release blood during cooking. If the chicken has reached at least 71°C for five minutes or more, it is safely cooked.
What are the main food safety temperatures?
+The UK Food Agency publishes temperature guidelines for storing and cooking food. You can use your thermometer to check temperatures and minimize foodborne illnesses in your kitchen. Bacteria grow between 4.5°C and 60°C. Food should not be stored between these temperatures for long periods of time. Some leftover food must be reheated to minimum temperatures to ensure a sufficient “kill rate” of bacteria or parasites.
Keeps foods hot at 63°C or higher
Keeps food cold below 8°C
Refrigerator temperature 4.5°C or less
Freezer temperature 18°C to -23°C
How to take an accurate fluid reading?
+The best way to take an accurate liquid reading is to first stir the liquid. Follow this by stirring the thermometer probe in the liquid, observing the temperature change as it moves.
Thermometry FAQ
How do I know if my food is perfectly cooked?
-This may seem obvious, but a thermometer is just a tool that gives you information about the temperature of the food you are preparing. YOU must decide when to increase or decrease the heat and when things are done based on the information provided by the thermometer. In most cases, you look for the highest temperature reached in the thickest part of the food to gauge whether the food is cooked.
Where should I place the probe tip to see if it is cooked?
+When testing your meat for doneness, the coldest part will be the very center of the thickest part. With larger foods, you can take quick readings with your thermometer in multiple locations to check that the entire portion is cooked. If you cool a food, the center of the thickest part will be the last to cool.
Keep in mind that different types of thermometers have different sized sensors. A dial thermometer can have a sensor up to an inch long and your reading will be an average of the temperature of all the different materials touching that sensor. Most digital thermometers have small sensors on the end. Reach into the food you are checking with the probe and place the tip of the probe where you want to measure.
What precautions should I take when grilling with a thermometer?
+Never leave a thermometer inside an oven, grill, smoker, or microwave while cooking unless it is specifically designed for that purpose. Do not leave your thermometer on the grill hood or near an open flame. Some probes are designed to be left inside an oven or grill, but the thermometer housing itself (where the electronics are kept) should generally be kept cool and should not be brought near the heat only for short periods. When checking temperatures over a grill or fire, be careful that the body of the thermometer does not become too hot.
How often should I calibrate my thermometer?
+The word "calibrate" is often thought to mean making some sort of adjustment to a thermometer to improve its accuracy. Although adjustments are sometimes necessary, "calibrating" a thermometer simply means testing its accuracy against a verifiable standard. If the thermometer meets the accuracy specifications stated by the manufacturer or quality control agency, no adjustments should be made.
When it comes to recommended frequency, the range is very wide. Mechanical thermometers like dial thermometers must be calibrated very regularly, even daily, while digital thermometers are often only calibrated once a year. Check the recommendation listed for your type and model of thermometer or check with the appropriate health department or quality control agency having authority over your operation.
Why won't my thermometer set a final temperature in food?
+Mainly because the temperature of food keeps changing while cooking and your digital thermometer is accurate enough to see it. Thermometers will only “lock” on a given reading if they have a “hold” function designed for this purpose.
What is an IP rating?
+An additional feature common to electronic thermometers, especially electronic cooking thermometers, is a splash or water proof rating.
The International Electrotechnical Commission (IEC) created a standard for evaluating instruments based on their ability to protect their electronic components from corrosion by water or dust. The International Protection Rating code (or IP code) is composed of the letters “IP” followed by two numbers.
The first number tells you how well an instrument's electronic components are protected against the ingress of solids (like dust) and the second number tells you how well they resist liquids. See the table here.
If, for example, a thermometer had an IP65 rating, this would mean that it was tested and found to be completely protected against dust as well as low pressure liquid jets from all sides, but NOT protected against water. immersion or accidental fall into soup.
Why does my thermometer read above 0°C (32°F) when placed in ice water?
+Probably because the temperature is above the ice point unless you take the time to create a properly done ice bath.
If the thermometer is in fact outside its published accuracy specifications, adjust accordingly or contact our after-sales service: info@thermometre.fr, 02 14 13 00 00.
Why can't I turn on my thermometer?
+Check the battery compartment. Many thermometers have a small metal clip that holds the batteries in place. Even if the batteries are in place, if they are not under this little clip, the thermometer will not turn on. If the clip is in place and the thermometer still does not turn on, contact after-sales service for advice (info@thermometre.fr, 02 14 13 00 00).
My new thermometer shows a different reading than my old one, why?
+Most likely, because your old thermometer is not as accurate as your new digital thermometer. Test both thermometers in a properly prepared ice bath to check and adjust accordingly or contact our after-sales service: info@thermometre.fr, 02 14 13 00 00.
How often should I clean my thermometer?
+You should wipe the probe with cleaning wipes or soap every time it comes into contact with raw meat, and you should wipe down the entire thermometer housing after each use, taking care not to get it wet. Never place your digital thermometer case near water unless it has an IP rating of 66 or higher. WARNING - IPA and other solvents may damage the housing and display of this instrument.
Will atmospheric pressure affect the boiling water temperature reading?
+The boiling point of water depends directly on (atmospheric) pressure. This is a physical property. Water boils at 100°C ONLY if it is pure (demineralized) and under an atmospheric pressure of 1013.25 hPa.
So, at high altitude or in bad weather or low pressure, you may think that the instrument is indicating the wrong temperature.
For example, at low atmospheric pressure at 990 hPa, water boils at 99.3°C and at higher atmospheric pressure at 1040 hPa, water boils at 100.7°C.
FAQ infrarouge
Why Use an Infrared Thermometer?
-Infrared thermometers are very fast, typically giving a reading in a fraction of a second, the time it takes for the thermometer's processor to complete its calculations.
Their speed and relative ease of use have made infrared thermometers invaluable public safety tools in the food service industry, manufacturing, HVAC, asphalt and concrete, laboratories, and countless other industrial applications .
Infrared thermometers are ideal for taking surface temperature measurements remotely. They provide relatively accurate temperatures without ever having to touch the object you are measuring.
This can be useful when it is not practical to insert a probe into the item being measured, or if the surface is simply out of reach and a surface probe will not do the job. You can use an infrared thermometer to measure objects:
- Fragile (computer circuits)
- Dangerous (gears, molten metal)
- Impenetrable (frozen food)
- Susceptible de contamination (aliments, solution saline)
- Movement (conveyor belt, living organisms)
- Out of range (air conditioning ducts, eardrums)
What types of lasers are used in infrared products?
+All infrared thermometers, equipped with laser pointers, comply with BS EN 60825-1: 2014: - Safety of laser products:
Part 1. Classification and equipment requirements: - Class 2. The basis of this harmonized EU standard is that the laser must be powerful enough to blink, but not powerful enough to damage tissue.
This prevents damage to the eye unless someone deliberately stares at the laser light for a long time, causing injury. That is, for consumer laser products in general, there is a requirement that, when employing technical means (i.e. technical controls), lasers must not cause harm to the eyes or skin. skin under normal and reasonably foreseeable conditions of use, including momentary, accidental or unintentional exposure.
Additionally, no lasers should be shone into anyone's eyes; this can be very inconvenient and lead to a serious incident. We strongly recommend using the laser only to help target the measured area, indicating the optical ratio of the instrument.
How do you turn on the laser on an infrared thermometer?
+This will depend on the model or type of your infrared thermometer. Read the user manual that came with your infrared thermometer to learn more about the full range of features it offers and how to use them.
How do you clean an infrared thermometer?
+For accuracy, an infrared thermometer should be free of dirt, dust, moisture, fog, smoke and debris. Always take the time to clean your infrared thermometer after exposure to a dirty, dusty, smoky or humid environment. You should also schedule regular cleaning approximately every six months. Particular care should be taken to keep the infrared lens or aperture clean and free of debris.
To clean your infrared thermometer:
1. Use a soft cloth or cotton swab with water or medical alcohol.
2. Carefully wipe the lens first, then the thermometer body.
3. Allow the lens to dry completely before using the thermometer.
4. Never immerse any part of the thermometer in water.
Can I calibrate my infrared thermometer?
+Infrared thermometers can be calibrated for accuracy, just like other thermometers.
In calibration laboratories like the UKAS certified calibration laboratory at our Worthing factory, our technicians use industrial blackbodies to calibrate infrared thermometers. You can contact them by email at info@thermometre.fr.
However, if neither an industrial blackbody nor a comparison cup are available, you can perform a quick calibration using a properly prepared ice bath.
What are infrared thermometers used for in the catering industry?
+Foodborne bacteria usually land first on the surface of food. Infrared thermometers can therefore be useful for spot-checking food storage temperatures on plates, serving areas, buffets and warming trays.
But infrared thermometers only measure surface temperatures and therefore are not very effective in measuring how well food is cooked. Use traditional probe thermometers for this. Critical temperatures for food safety, such as 5°C and 60°C, should always be checked with an internal probe.
Fortunately, there are three infrared thermometers ideal for this. THE RayTemp 8 And RayTemp 38 come with removable K-type probes, while the thermometer Thermapen IR has a built-in foldable probe to allow internal temperature measurements to be taken.
Can I check if food is properly cooked with an infrared thermometer?
+Infrared thermometers only measure surface temperatures, so they are not very effective in checking whether food is properly cooked. Use traditional probe thermometers for this.
If you use an infrared thermometer with liquids like soups and sauces, be sure to stir vigorously before taking a reading to better approximate the internal temperature of the liquid. Be aware that steam, even when a liquid is not boiling, can condense on your thermometer and affect the accuracy of your measurements.
Can I check grilling temperatures with an infrared thermometer?
+Aiming an infrared thermometer at a porous surface like a grill or grate will take into account the surface temperature of all surfaces visible through the holes in the grill or grate when calculating a final temperature for your reading.
To accurately measure the temperature of a porous grill or grill, place a solid surface such as an iron plate or skillet on the grill, allow it to reach temperature, and measure the plate or skillet. Then spray a little cooking oil on the plate or pan to ensure good emissivity.
What batteries should I use for infrared thermometers?
+Our range of infrared thermometers require different batteries and have varying lifespans.
Below is a list for each:
1. Infrared thermometer Mini RayTemp - Battery type: alkaline PP3 9 volts. Battery life: 80 hours of continuous use.
2. Thermometer Poche IR – Battery type: 2 x 1.5 volt AAA. Battery life: 20 hours of continuous use.
3. High precision infrared thermometer RayTemp 2 - Battery type: 3 x 1.5 volt AAA. Battery life: 5000 hours of continuous use. Infrared thermometer RayTemp 2 Plus with 360° automatic rotating display – Battery type: 3 x 1.5 volt AAA. Battery life: 5,000 hours continuous.
5. Infrared thermometer blue RayTemp – Battery type: 3 x 1.5 volt AAA. Battery life: 3000 hours.
6. Thermometer IR RayTemp HSE – Battery type: 3 x 1.5 volt AAA. Battery life: 100 hours with backlight, 300 hours without backlight.
7. Infrared thermometer RayTemp 3 – Battery type: 2 x 1.5 volt AAA. Battery life: 140 hours of continuous use.
8. Infrared thermometer RayTemp 8 with socket thermocouple type K, RayTemp 38 infrared thermometer and infrared thermometer kit – Battery type: 2 x AAA alkaline. Battery life: 180 hours of continuous use.
9. Infrared thermometer Thermapen IR and Thermapen IR with air probe – Battery type: 2 CR2032 3 volt lithium button cells – Battery life: 1000 hours of continuous use.
10. Non-contact forehead thermometer – Battery type: 2 x AAA alkaline (included). Battery life: 3000 hours (automatic shutdown after 60 seconds).
What do spot size, spot ratio, and distance to target ratio mean?
+The “spot size” of any measurement is controlled by two variables:
1. The “distance/target ratio” or “spot ratio” of your infrared thermometer.
2. The distance between your infrared thermometer and the target.
Usually shown on the thermometer itself, the "distance to target ratio" (DTR) or "spot ratio" tells you the diameter of the surface "circle" that an infrared thermometer will measure at a given distance.
For example, an infrared thermometer with a 12:1 ratio will measure the temperature of a 1" diameter surface circle at 12" distance, a 2" diameter surface circle at 24" distance, And so on.
What is emissivity?
+“Emissivity” is a measure of the relative ability of a material to emit radiated energy. It is measured on a scale from just over 0.00 to just below 1.00.
Emissivity depends on factors such as temperature, emission angle and wavelength. Generally, the closer a material's emissivity is to 1.00, the more likely that material is to absorb reflected or ambient infrared energy and emit only its own infrared radiation. Most organic materials, including plant and animal byproducts, have an emissivity rating of 0.95.
Check your infrared thermometer to see if it has adjustable emissivity settings.
What to do when emissivity is low?
+Use a patch to get an accurate measurement. Another way to get an accurate temperature measurement on a low-e material is to cover it with a high-e object and allow it to reach temperature.
For example, a polished metal pan can be coated with a thin layer of cooking oil with an emissivity rating of 0.95. Be sure to allow time for the cooking oil to reach temperature before taking your measurement. But once they're at the same temperature, high-emissive cooking oil makes it easier to check the temperature of the pan.
The temperature of other metals can be measured more accurately by spraying a spot of flat black paint or applying a few pieces of black electrical tape and allowing it to reach temperature - both have an emissivity rating of 0.95 . However, when using this method, be careful that the field of view of your measurement does not extend beyond the blackened spot, otherwise your reading will be skewed by the surrounding metal.
This is also a great way to get a reading on a non-organic surface with a fixed emissivity infrared thermometer.
What is the fixed emissivity on an infrared thermometer?
+Fixed emissivity is a setting on some infrared thermometers, usually 0.95 or 0.97, that attempts to simplify their operation while still leaving them suitable for most material surfaces, including almost all foods. Other infrared thermometers feature adjustable emissivity settings, allowing you to more precisely prepare your infrared thermometers for the type of surface being measured, especially when measuring non-organic surfaces.
Fixed emissivity infrared thermometers:
Infrared thermometers with adjustable emissivity:
I'm getting strange results on shiny metals, why?
+Highly polished metals generally have very low emissivity ratings because they tend to reflect a lot of ambient infrared energy and emit their own electromagnetic waves less effectively. If you point a fixed-emissivity infrared thermometer at a stainless steel pot filled with boiling water, you might get a reading closer to 100°F (38°C) than 212°F (100°C). In fact, shiny metal reflects the ambient radiation of the room better than it emits its own infrared radiation.
Some infrared thermometers have fixed emissivity settings (usually 0.95 or 0.97) to simplify their operation while leaving them suitable for most material surfaces, including almost any food.
Other infrared thermometers have adjustable emissivity settings, allowing you to more precisely prepare your thermometer for the type of surface being measured, especially when measuring non-organic surfaces.
Can infrared thermometers work through glass or clear plastic?
+An infrared thermometer does NOT measure temperature accurately through glass, liquids, or other transparent surfaces, even if visible light (such as a laser) passes through them. If you point an infrared thermometer at a subject through a closed window, you will measure the surface temperature of the window itself, not the object you are aiming at.
Can an infrared thermometer measure water temperature?
+No. As in the answer above and for the same reasons, an infrared thermometer will only measure the surface temperature of the water, not the temperature of the object.
How to use an infrared thermometer with liquids?
+If using an infrared thermometer with liquids like soups and sauces, pull a ladle full of liquid from the bottom of the pan before taking a measurement to better approximate the internal temperature. To measure semi-solid materials like stuffing, corn or mashed potatoes, insert a spoon into the center of the material, pulling it back to create a vacuum and point your infrared thermometer into the vacuum .
How to use infrared thermometers in a refrigerator or freezer?
+Infrared thermometers used to measure temperatures inside a refrigerator or freezer generally need to be stored inside the refrigerator or freezer so that they are ready to start taking readings when you have them need. To measure the contents of frozen pallets, be sure to open the pallet, remove at least one box, and point your thermometer toward the top of one of the center boxes to ensure your reading reflects the temperature of the frozen material inside the pallet and not just the surfaces exposed to warmer air.
FAQ Thermapen
What sets the Thermapen apart from other food thermometers?
-The Thermapen is the fastest, most accurate and most sensitive thermometer on the market. Our products are handmade in our factories in Worthing, West Sussex. Each Thermapen comes with a calibration certificate, certifying that it has been manually calibrated in a laboratory against a precision thermometer and found to be accurate to 0°C (ice point) and 100° C (boiling point).
This calibration certificate is traceable, via international agreement, to all major national standards including UKAS and NIST.
What makes the Thermapen so fast compared to other thermometers?
+The incredible speed of our Thermapen thermometers is the result of high-quality equipment and rigorous manufacturing processes. Plus the thread of thermocouple is closer to the base of the probe, the faster the response. We thread the wires by hand and then perform speed tests to verify that they meet their specifications. Any probes that are out of range must be completely redone.
Will my Thermapen work with an induction cooker?
+Most of our digital thermometers will be affected by the electromagnetic force (EMF) generated by the cooktop and various studies have been carried out on the inherent dangers to humans in the vicinity of active surfaces.
Manufacturers recommend not using metal spoons. We are concerned that any metal present in a probe design will be affected and therefore produce errors.
At this point we recommend recording the results by heating pans, removing them from the influence of the hob and quickly carrying out a test measurement. We understand that rapid cooling will reduce temperature results, we also suggest an infrared thermometer like the IR-Pocket Thermometer (814-060) which has adjustable emissivity or perhaps a mineral insulated probe.
How do I clean my Thermapen body?
+Although Thermapen ONE & Professional are waterproof and can survive short-term immersion, they cannot be put in the dishwasher. The safest and most hygienic way to clean your Thermapen body is with wipes antibacterial agents or a cleaning spray.
What should I do if the temperature display fluctuates?
+Food temperature is very dynamic, especially during cooking, and the Thermapen is fast and accurate enough to show tiny temperature changes as they occur.
The probe tip of the Thermapen can be pushed through food, helping you find the coldest part of the center and can show temperature differences from place to place (different parts of a whole turkey may defer up to 11°C).
Although the Thermapen may take a few seconds to go from room temperature (room temperature) to the temperature of a food or liquid, once its micro-thermocouple has fine-tuned the current temperature, it is very quick to detect and display changes (the display is updated every half-second).
Sometimes people think that cooking thermometers should be like a scale or quick gun and lock on to the temperature once it is detected, but rest assured, if the numbers on the Thermapen change, the temperature of the food changes!
Of course, these minor changes can be hidden by changing the Thermapen's display resolution from tenths to whole numbers.
How do I customize Thermapen settings?
+You can customize your Thermapen by changing the factory default settings, including:
Change display units from °C to °F,
change the display resolution from 0.1° to 1° and turn off the auto-off function.
What battery should I use for my Thermapen?
+We offer a range of Thermapens and some require different batteries and have varying lifespans. Below is a list for each:
1. Thermapen Professional Thermometer – Battery Type: 1.5 Volt AAA. Battery life: 3,000 hours.
2. Thermapen Surface, Thermapen Air, Thermapen Classic, Thermapen Classic with powerful probe, Thermapen Sous Vide thermometer and Thermapen Burger probe - Battery type: 2 CR2032 3 volt lithium button cells. Battery life: 1,500 hours.
3. Thermapen Sous Vide Thermometer and Thermapen reference – Battery type: 2 CR2032 3-volt lithium button batteries. Battery life: 1000 hours of continuous use.
4. Thermapen ONE- Battery type: 1.5 volt AAA. Battery life: 2000 hours (without backlight), 100 hours backlight per hour
5. Thermapen Blue Wireless Thermometer – Battery Type: 1.5 Volt AAA. Battery life: 1,000 hours.
How do I change the battery in my Thermapen One?
+- Thermapen ONE – 1 x AAA
A low battery symbol will appear when the battery needs to be replaced. In these conditions, the backlight is set to a low level to save battery power. The instrument continues to measure accurately but we recommend changing the battery as soon as possible.
To replace the battery, loosen the battery cover screw using a Pozi screwdriver (PZ1) to remove the battery cover. Replace it with a single AAA battery, noting the polarity. Tighten the battery cover screw until the battery cover fits snugly over the gasket. Do not overtighten.
If you have any problems replacing the batteries, simply contact us via our online contact form and a member of our dedicated team will contact you to help.
How do I change the battery in my Thermapen Classic?
+- Thermapen Classic – 2 pile bouton au lithium CR2032 de 3 volts
A battery symbol indicates that the batteries will need to be replaced. The instrument continues to measure accurately but we recommend changing the batteries as soon as possible.
To replace the batteries, remove the battery cover using a coin. Remove the batteries by pulling the battery retaining clip while holding the device upside down. Replace both batteries, positive side up, replace the cover.
If you have any problems replacing the batteries, simply contact us via our online contact form and a member of our dedicated team will contact you to help.
I've seen cheaper thermometers, why pay more for a Thermapen?
+Cheaper thermometers are limited by the technology they use. These can be mass produced for just pennies to a few pounds. On the other hand, the Thermapen is assembled and tested by hand in the UK and uses a professional thermocouple circuit design. This design and quality costs more to manufacture than cheaper, lower performing thermometers.
Thermometer Probe FAQ
How to avoid damaging your probe?
-- Use the probe only for liquids and semi-solid foods.
- Do not “stab” food, careful insertion will penetrate most foods.
- Do not lift heavy food with the tip of the probe.
- Do not hit the bones with the tip of the probe.
- Do not use the probe as an ice pick.
- The probe shaft and tip should not be bent.
- For frozen foods, place the probe tip between two frozen packages or use a drill to make a hole in the food before placing the probe tip in the hole.
- Do not create a hole with the tip of the probe.
- Do not use the probe to lift or pierce non-food objects.
- Do not expose the probe tip to flames or temperatures exceeding the probe temperature limit.
- Do not expose the handle to high temperatures.
- Do not wrap the cable too tightly around the handle.
- Avoid excessive heat which could melt the cable.
- Avoid excessive tension, crimping or stretching of the cable.
- Do not lift the instrument by the probe or cable.
- Keep the probe connector and instrument clean and dry.
- When plugging the probe into the device, avoid bending the pins.
- Do not immerse the probe handle in liquid (except waterproof probes).
- Damage is not covered by the probe warranty.
How to clean the probe?
+Use probe wipes to clean the probe after each food measurement to avoid cross-contamination, wiping both the handle and cable.
Other food safe cleaning solutions can be used with paper napkins instead of probe wipes.
How to get accurate results?
+The temperature of food is very dynamic, especially during cooking. For hot foods, find the coldest part of the food by placing the tip of the probe on the thickest part of the food. For cold foods, find the warmest part of the food. For the most accurate measurements, avoid the sides of any container.
Sometimes people think that cooking thermometers should be like a scale or speed gun and lock on to the temperature once it is detected, but rest assured, if the numbers change, the temperature of the food changes always.
How to avoid damage?
+Temperature probes are precision measuring devices. At the tip of the probe is an electronic sensor connected by wires passing through the probe tube. With proper care, this probe will last a long time and provide accurate measurements.
- Do not “stab” food, careful insertion will penetrate most foods.
- Avoid hitting bones with the tip of the probe
- The probe shaft and tip should not be bent
- Do not lift heavy food with the tip of the probe.
- Do not use the probe as an ice pick
- For frozen foods, place the probe tip between two frozen packages or use a drill to make a hole in the food before placing the probe tip in the hole. Do not create a hole with the tip of the probe
- Do not use the probe to lift or pierce non-food objects.
- Do not expose the probe tip to flames or temperatures exceeding the probe temperature limit.
- Do not expose the handle to high temperatures
- Do not wrap the cable too tightly around the handle.
- Avoid excessive heat which could melt the cable.
- Avoid excessive tension, crimping or stretching of the cable.
- Do not lift the instrument by the probe or cable.
- Keep the probe connector and instrument clean and dry.
- When plugging the probe into the device, avoid bending the pins.
- Do not immerse the probe handle in liquid (except waterproof probes).
- Damage is not covered by the probe warranty
Data Logger FAQ
Where can I find the latest software for my data logger?
-Each data logger comes with its own software. You can download the software when you visit the product article page.
Why does my RF Logger Base Station seem to turn off after a few days?
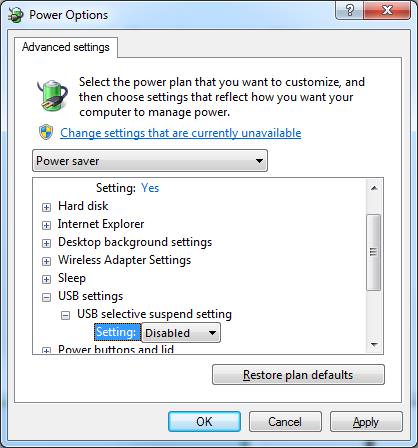
+This may be due to the Windows feature, USB Selective Suspend, which turns the base station's USB port on and off.
1. Open your computer's power settings.
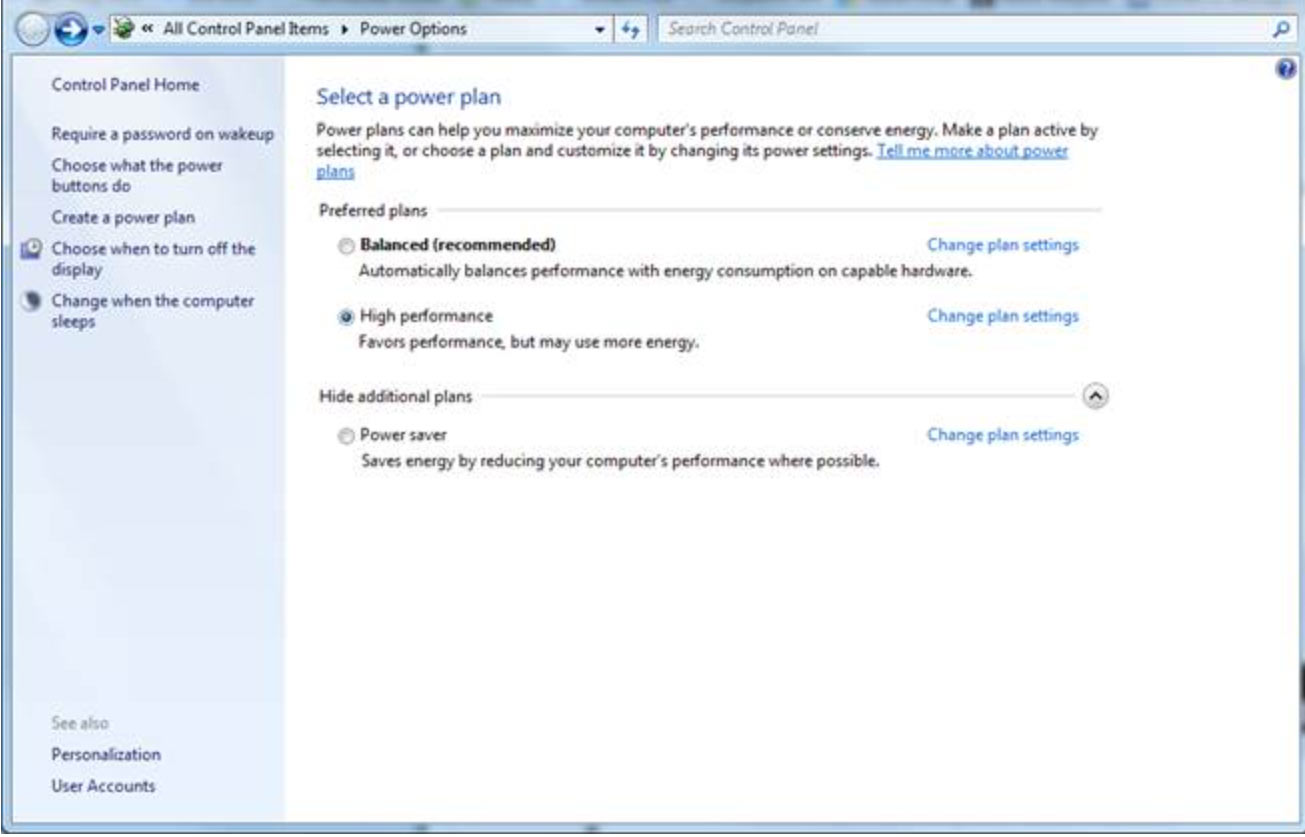
2. Click “change plan settings”.
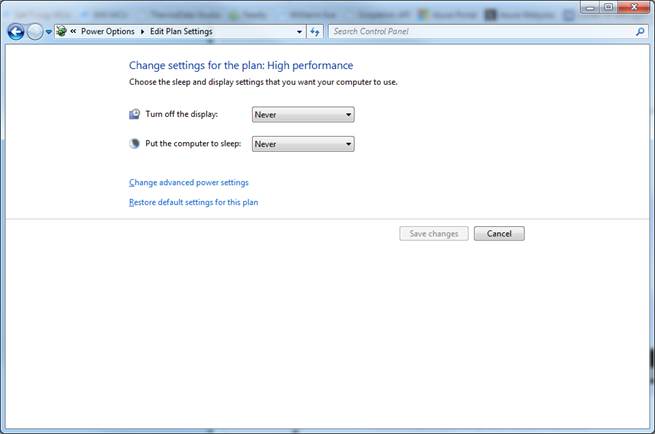
3. Choose “Change advanced power settings”.
My data logger comes without a printed user manual, why?
+Thermometre.fr cares about the environment. Therefore, all our recording systems do not come with a printed copy of the user manual, which wastes resources, but it is included on the software installation CD supplied with your data logger. It can also be downloaded directly from the individual product pages of this website by visiting the appropriate logger page and then clicking on the Download tab.
How can I differentiate between multiple loggers in my data?
+One of the key settings for your recorders is to give each unit a name to differentiate it from other units on the same network. Most people use either a number, location, or type of material being measured to name their loggers (i.e. "logger1", "upper_freezer", or "raw_fish").
How do I download data from my logger to my computer?
+Some of our data loggers have built-in cable connectors or wireless capability that can connect directly to your computer, others require the purchase of a separate data stand or dock which connects directly to your computer via your USB port.
My data logger is not working, why?
+The most common problem when getting your recorder up and running is loading the correct drivers. This can usually be checked by checking the System Device Manager on your PC.
Another common problem is failure to install the required software and register each recording unit before installing them. If you need help, do not hesitate to contact our after-sales service: info@thermometre.fr, 02 14 13 00 00.
Does my data logger require configuration before use?
+Yes. Some of our data loggers come with predefined default settings and are ready to use, but others will only work once configured by selecting settings directly on the recording unit or using a wizard computer-controlled and recording each one. unit with control software. Even units with predefined default values should be customized to your particular needs (high and low alarms, frequency of measurements, etc.) before use.
Pressure Gauges FAQ
What is a pressure gauge?
-A pressure gauge, also called a manometer or pressure gauge, is a portable device that measures the pressure of a gas or liquid in a system.
You can purchase analog or digital pressure gauges, although digital options are often preferred due to their flexibility, reliability, and wide range of units. Pressure gauges often measure absolute, gauge, or differential pressure, or a combination of the three.
What is a pressure gauge used for?
+Pressure gauges are most often used by gas HVAC professionals to identify problems such as leaks in heating system pipes. Some specific applications include:
- Measurement of smoke draft
- Gas pressure in heaters
- Air conditioning ducts
- Filter differential pressure monitoring
- Speed measurement with a Pitot tube.
How to use a pressure gauge?
+Digital pressure gauges generally work by connecting the device to the system you are measuring using a hose. Simply program the device to display readings in the desired unit, connect the hose and perform the required test. The pressure gauge screen will display the pressure in the chosen unit.
What is the difference between absolute, gauge and differential pressure?
+It is important when taking pressure measurements to be clear about which measurement to use: absolute, relative or differential. Each is suitable for different applications.
Absolute pressure
Containers that contain no molecules, no matter, no atmospheric pressure, such as a vacuum, have zero pressure. Absolute pressure is when pressure is measured on a scale that uses that zero as a reference point.
Absolute pressure readings are ideal for applications where they are not influenced by changes in atmospheric pressure, such as completely sealed, non-flexible containers.
Gauge pressure
Gauge pressure uses current atmospheric pressure as a reference point instead of zero. A gauge pressure reading is a reading of absolute pressure minus the atmospheric pressure of the space/container you are measuring.
Gauge pressure readings are ideal for applications influenced by changes in atmospheric pressure, such as an open container.
Differential pressure
Differential pressure is used when reading and reference values are variable. It is calculated by subtracting one of these values from the other. For example, if you are measuring gas flow along a pipeline and the pressure is 20 psi at one end and 50 psi at the other, the differential pressure is 30 psi.
Differential pressure readings are ideal for applications where users need to know the pressure difference between two locations.
pH Instrument FAQ
Where can pH meters be used?
-pH meters can be used in many areas, for example:
- Food production
- Water quality
- Processing industry
- Laboratories
- Fish farming
- Aquariums
- Agriculture
How do pH meters work?
+pH meters work by measuring tiny particles, called ions, with two glass electrodes, one of which has a permeable junction. This permeable junction allows a small amount of gel solution to pass through to complete a liquid bridge. If this junction dries out, the liquid bridge cannot form and the instrument will not operate accurately. Therefore, unlike most instruments, glass electrodes must be kept moist with a storage liquid so that the junction is not blocked.
The pH meter has a limited lifespan due to gradual aging of the sensor and will only last approximately 360 readings (or a year for one reading per day).
How to maintain a pH instrument?
+If you do not take care of your pH meter, incorrect measurements of pH levels may occur. At a minimum, you should always wash the pH electrode (the measuring part of the instrument) with clean water. Do not touch the pH electrode unless using a tissue or damp cloth for cleaning and only with extreme caution.
When not in use, ensure that the pH meter electrode is kept moist in a storage solution or pH 4 solution. If the sensor dries completely, the performance of the instrument will be affected and its warranty invalidated.
If an electrode has dried out or becomes slow to respond, it can be rejuvenated by soaking it overnight in a storage solution. After soaking overnight, rinse the electrode then soak it in a 4 pH buffer solution before rinsing the electrode one last time. The electrode should then be ready for use.
How often should I calibrate my pH tester or device?
+Depending on the precision sought, once a day if several measurements are necessary during the day; or at least once a week if you use 2 or 3 times a week.
What do I need to calibrate my pH instrument?
+To ensure accurate measurements, it is necessary to calibrate pH meters regularly. For this, you will need pH buffer solutions. These standard, inexpensive solutions make it possible to verify that the pH reading is correct.
If this is not the case, this can be easily corrected by following the procedure for the specific instrument. In general, pH electrodes have a limited lifespan, which depends on frequency of use.
Why does the pH tester or meter take a while to get a stable reading?
+The electrode was dry or poorly conditioned. The reference junction may be blocked. Remedy: Pre-soak the electrode for 1 hour in tap water before use.
How long does a pH tester last?
+All pH glass electrodes will age with time and temperature. Most glass electrodes have a shelf life of approximately 1 year. A lifespan of approximately 3 to 6 months for frequent/continuous use.
What other problems are associated with measuring pH?
+Temperature is important because the properties of the liquid are affected. Therefore, a correct temperature of 25°C for the buffer solutions must be maintained during calibration. However, a correction of the values can be carried out if the temperature of the solution is known, by comparison with the table below. Different temperatures of test samples will give inconsistent results.
Why does the pH tester or meter show 1 or show an erratic reading when powered on?
+When the electrode is held in air and not immersed or in contact with a solution, it will show erratic readings. This is because the reference and the glass electrode are in close contact, so the electronics cannot display a fixed reading. Dip the electrode in any solution and a reading will appear.

